Y’all… Picture Cards!

Okay, so I am not sure about where YOU teach, but down here in Texas there is a BIG push for us to get the kids doing more interpersonal and presentational speaking. And, of course, writing to get them ready for that AP exam. It seems to me that kids don’t get excited about too much in class, so when I find something they like, I RUN with it!

So, I was using some random pics of Mark Wahlberg as conversation starters the week before spring break. Why Mark Wahlberg, you ask? Well, my students would tell you I have an obsession. LOL. I figure, if I HAVE to find some pictures to talk about and do that all day, they may as well be something I like looking at. (My students even made an IG account a few years ago where they edit pics of Mark and I together, and they have been passing the torch over the years). Anyway, I digress…

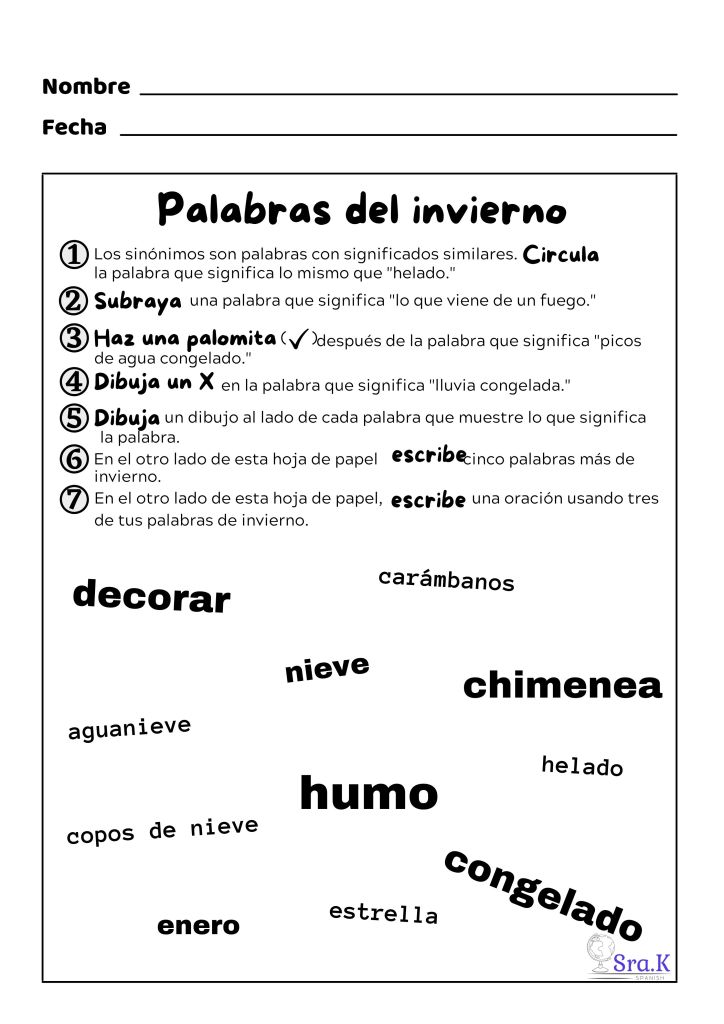
So, I decided to make some that hit the cycles of instruction I use from the Stepping Stones materials. I also have required vocabulary I have to teach, so this has worked out perfectly. It allows for personalized learning because I can evaluate the output according to level.

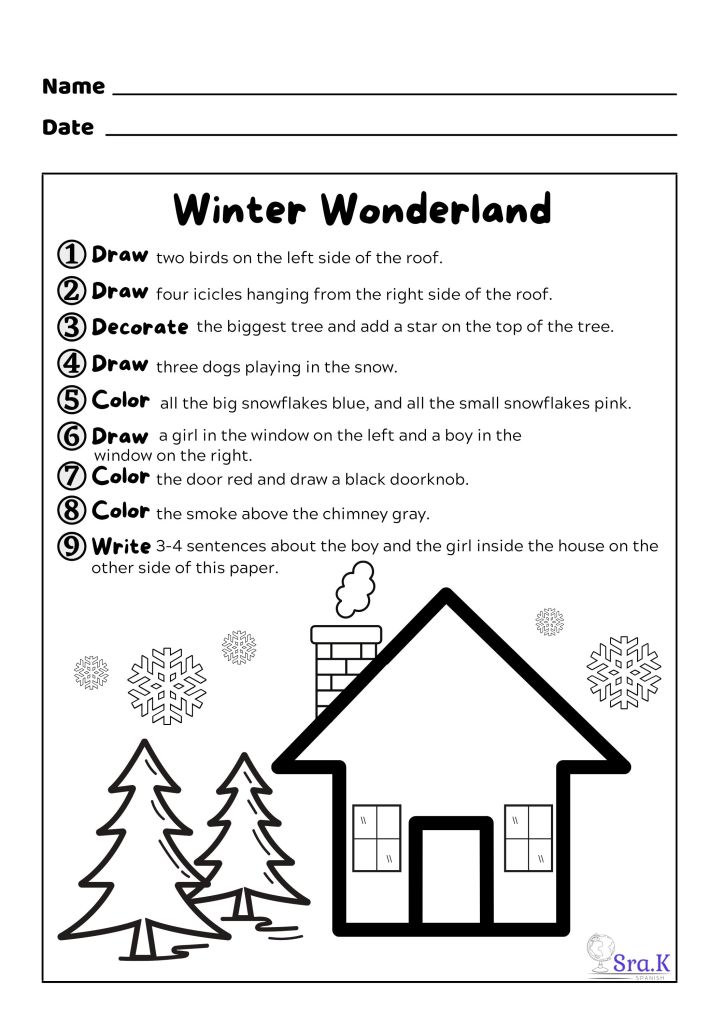
I have used them by printing them with the pic on the front and the prompts on the back. There are LOTS of ways to use these!

For Interpersonal Speaking, I hand out a card to each pair of students in my class and then I have them choose one of the prompts on the back. I give them about 90 seconds to collect their thoughts and then I have them start by using the prompt to give some info and ask some questions. The partner has to look at the picture (provides scaffolding) and talk about it with their partner.

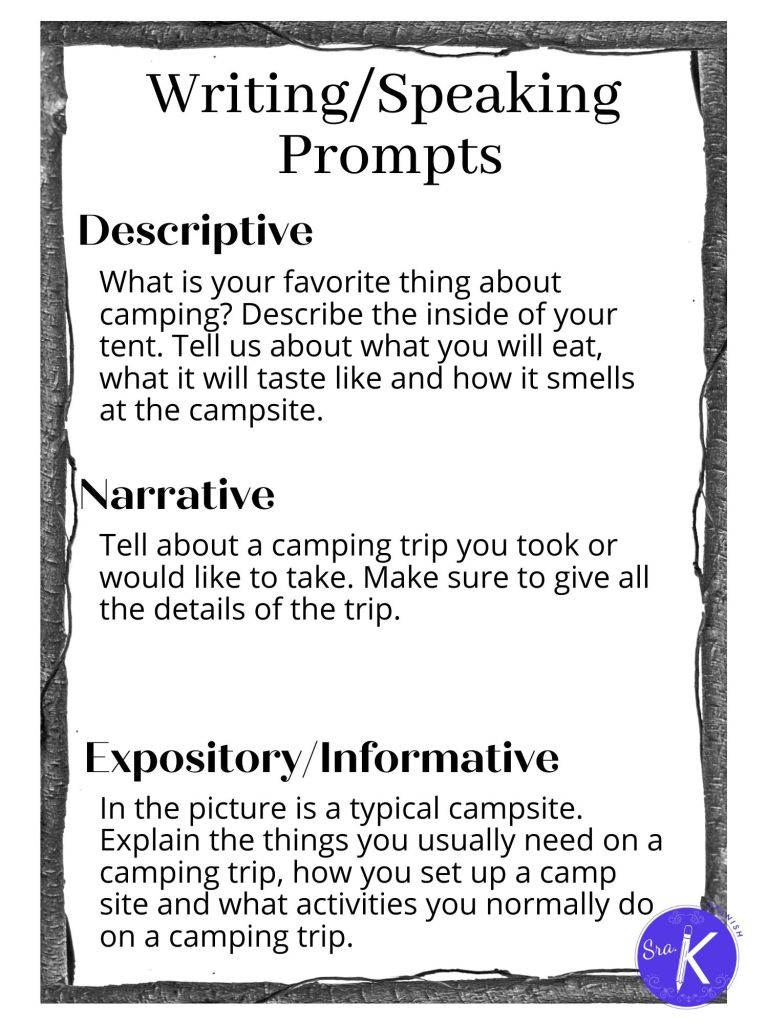
For Presentational Speaking or Writing, I give a card to each student. For this one, I told them which prompt they had to use, gave them a couple minutes to prep and then got them talking ( or writing).

You can use any pics you want. I have more of them for sale in my TpT store HERE.

Happy Teaching!

Alana

Find me on Instagram (@SraKSpanish) , Facebook (sra k Spanish) and Follow my TpT store as I build more resources!

Beat Technology Fatigue! No Tech Required…

It seems that ever since we went virtual out of necessity at the start of the pandemic, we have made most things digital. That is okay for lots of things, but I find more and more that kids are burnt out on technology. That may not be true for your students in your teaching context, but it is my reality right now. So, how can I address this tech fatigue??

One thing I did a few weeks ago was play the old game “Dots and Boxes.” I wasn’t sure how it would go. To be honest, I had a back-up Gimkit game all loaded and ready to go just in case. Much to my surprise, it was a HUGE hit!

The digital version of this can be found on my TpT store.

So, what did I do? Well, I reached back into my archive of worksheets that would review the concepts we needed for the assessment. Some were reading worksheets with questions about the reading (reading). Some were fill in the blank worksheets with targeted vocab and grammar required by my district (writing). Some were questions that had to be answered aloud (speaking). Some were based on a podcast and/or video they had to watch and listen to in order to answer the question. I briefly explained each page (I gave them 5) and then explained the game like this:

First, you start with a blank grid of dots.

Then, you allow one person to connect two dots to make one line.

Then, the next person must connect two dots, making a line.

This continues until there are are enough to make a box.

If you draw the 4th line that closes the box, you get to put your initials in that box.

This continues until all boxes have been made.

The winner is the one with the MOST boxes with initials.

The dots that you draw can be on your whiteboard or you can project the image above.

So, you have the worksheets, you have the grid…how do you put it all together? Great question! What I did was first project the image above on my board. Then, I passed out a packet of the worksheets. I sat in a central part of my classroom where I could watch what was happening and I got a self-inking stamp (this will save your initials a million times in one day). Once students finished a couple of questions, they could come to me to check. I told them they had to have 5 questions completed on the worksheets or have one of the speaking prompts ready to go. If they were all correct, they got a stamp on their paper (made grading easier when I chose which one to grade) and they got to go draw a line. They could NOT draw a line until they were all correct. If even one was incorrect, I sent them back. This infuriated some, as I wouldn’t tell them which was incorrect. It made for some great group work though! They were ALL engaged and trying to win another line!

It was fun, engaging and they learned and problem-solved a LOT! Win-win.

I hope this helps with some ideas for teaching these required vocabulary sets and/or topics while keeping lessons focused on communication!

Happy Teaching!

Alana

Find me on Instagram (@SraKSpanish) , Facebook (sra k Spanish) and Follow my TpT store as I build more resources!

Another “Fun with Vocabulary” Listening & Speaking Activity

So, everyone knows teaching required vocabulary can be dry and SUPER boring for students AND their teachers. I posted earlier in THIS post about one way I was working through some vocabulary required by my district in a more engaging way and incorporating listening and speaking.

Well, I am teaching some restaurant-related vocabulary now and decided to do the same kind of activity since it was super popular last time. So, HERE is the activity I call, “What’s on the Menu?” I have included some common foods you would find at restaurants, but it is super easy to insert your own too! I hope this helps some of you make this a less painful vocabulary lesson! Remember, if YOU enjoy the activity, they will too!!!

I hope this helps with some ideas for teaching these required vocabulary sets and/or topics while keeping lessons focused on communication!

Happy Teaching!

Alana

Find me on Instagram (@SraKSpanish) , Facebook (sra k Spanish) and Follow my TpT store as I build more resources!

Come Join our NEW Facebook Community!

I have created a new FB group to share new things in real time and be able to communicate with everyone! I am super excited and hope you will join me HERE. Just click the link and Join our Sra K Spanish and ESOL group!

Don’t worry! If you teach another language, I share lots of things that can be used for ANY language teacher! Hope to see you all in the group!

Happy Teaching!

-Alana

Find me on Instagram (@SraKSpanish) , Facebook (sra k Spanish) and Follow my TpT store as I build more resources!

Celebrating Afro-Latinos in Spanish Class

Teaching about Afro-Latinos is something I do all year long, but, during Black History Month here in the United States, I do like to show the great documentary entitled, “AfroLatinos the Documentary.” You can see it on Vimeo HERE.

I currently work in a school with several Afrolatino students each year in my Spanish for Spanish Speaker classes, and I have found showing this documentary is really helpful to them. We watch it together in all my Spanish classes, we stop and answer some discussion questions (which you can find HERE) and we process it together.

There are also some others that are pretty easy to access. One good one with shorter episodes is called “Black in Latin America,” which can be found with an easy Youtube search.

Regardless of the resource, it is important to continue to educate others about this population, which is often not mentioned in Latin American culture. Although it is best to include this population throughout the year, this month is a great opportunity to learn about how Central America and South America have been influenced by Afrolatinos and their culture.

Happy Teaching!

-Alana

Find me on Instagram (@SraKSpanish) and Follow my TpT store as I build more resources!

Have some digital fun! …or make manipulatives!

Hey there! It has been a while since I have posted. It has just been…quite a start to 2022. I hope you are all getting into the semester and finding your groove.

I have an activity that may be fun and can be adapted. I did this with my students last week in my Spanish classes AND my ESOL class and it was a HIT! So, of course, I will be making more. For now, I will share THIS one and how I used it.

I created THIS slideshow. I gave each student a copy of the slideshow through our LMS (we use Schoology, but you could do this with Google Classroom or Canva or whatever you use).

First, we reviewed the items on the last slides (the moveable parts). We practiced describing them by color, size and name. It was a great practice! Then, I had them open their copy of the slideshow. We chose a room and then I covered my projector. I called out the item and where to place it in the room. (We have recently covered prepositions of place.) After about 5 items, I revealed my room and had them look and see if theirs was the same. We did this a few times with different objects. Then, I had them partner up and create a room and a script of sentences. I only gave them about 5 minutes. Then, as time allowed, I had students come up to my computer and do the same thing for the class. They loved seeing if they could stump their friends.

This could also be used as manipulatives! You could print the blank room slides on paper and laminate them or put them in page protectors. Then, you could print the objects and cut them out and laminate them. this would allow students to move them around. I think this would be especially fun for the littles, but I know my middle schoolers would love it too.

I hope this gives you a fun activity to do and some ideas about how to use these. I will have more for sale in my TpT store in the next couple of weeks. For now, I hope you enjoy it!

Happy Teaching!

-Alana

Find me on Instagram (@SraKSpanish) and Follow my TpT store as I build more resources!

Winter Vocabulary Practice

I am gearing up for the first few days back from break! I know, I should be relaxing and disconnecting. I have been, I promise, but I also know I relax better when I am prepared.

So… I have been continuing with my series of Following Simple Directions worksheets. I know worksheets are NOT the preferred task, and I plan to do a lot of guided vocabulary work and story telling along with this, but, that being said, I feel like my students are better on task when there is something concrete for them to accomplish and turn in. I hope to NOT have to do this next year, but my students seem to really need the structure and to be reminded how to be in school this year.

HERE is the link to the PDF with English AND Spanish

Anyway, I hope you can find some way to use this that will benefit your students. This is just one level. The leveled versions will be up for sale on my TpT store by the end of the week.

HERE is the link to the PDF with English AND Spanish

I have also created some New Year Student Practice for Following Simple Directions for sale on my TpT store. HERE is the link to the Spanish, and HERE is the link to the English.

Happy teaching!

Follow this blog for more great, free resources! Find me on Instagram (@SraKSpanish) and Follow my TpT store as I build more resources!

Following Simple Directions – Around the House

I am beginning to prep for the next semester and using this time off to create some fun, fresh new resources with that “old school” kind of feel to them. Sometimes, the quick, easy things really help keep class moving.

After talking about houses, looking at pictures of different rooms inside the house (there will be more resources you can find on my TpT store in January), I would give students this page. We could do it together OR they could work with a partner or in small groups OR students could try it on their own. Then, I would have students use this as an example and then have them draw their dream house on the other side of the paper, labeling the rooms and, depending on their level, putting things in the room to support the room.

This is only one level. I do plan to have at least one more level and a digital version with moveable parts in a pack on my TpT store, but I wanted to share THIS free English and Spanish version in hopes it helps you build a lesson that fits well in your teaching context.

HERE is a link to the English and Spanish PDF

Happy Teaching!

-Alana

Find me on Instagram (@SraKSpanish) and Follow my TpT store as I build more resources!

Following Simple Directions – “Do you want to build a snowman. . .?”

I am starting to think about coming back from the break… I know, I know. It creates a little anxiety. What I am feeling this year is that I need to be a little easier on my students AND myself. So, in doing some healthy self-reflection, I have realized what that looks like for me, personally.

Going easy on my students AND myself is remembering that not every activity, every practice has to be catchy and new and fancy. Maybe, just maybe, we need a little bit of the good old days…

In that spirit, I created THIS activity in English AND Spanish. It is part of a bigger pack of a “Following Simple Directions” group of activities. The first part of the series, this Snowman activity, is already up on my TpT store in Beginner, Intermediate AND Advanced versions. Follow the blog to get updates about the rest of the series of activities.

You can find the PDF version in the paragraph above this in the link.

In the product on TpT, there will be another level up to make it more challenging and focused on using commands for upper levels, but I hope this might be an easy, short activity to get everyone all back in the groove when we all have that hard return to classes.

Hope this is, at least, a fun thing to keep in your back pocket for a simple activity that can be printed or put up on your digital classroom.

Follow this blog for more great, free resources! Find me on Instagram (@SraKSpanish) and Follow my TpT store as I build more resources!

Easy Winter Poster Project and Gallery Walk (Cultural Comparisons)

Whether you are trying to plan these last few days before winter break or you are trying to find something to plan for the first few days you get back, this may be an easy option!

First, you will have to decide if your students can work in small groups or with a partner, or if that is too much for them this time of year. Personally, my students are at that point where trying to keep them quiet is worse for me than just finding an activity they can do together.

Next, you will need to find enough pieces of poster board, butcher paper, or chart paper so that each group can have one.

Then, give them the instructions:

(This is one I have used in emergency situations for a few years)

Then, make sure you give them a time limit for research. Some students could spend DAYS on the computer getting distracted. I have found that if I give them a very structured schedule of WHEN I expect each part to be done (also known as “chunking the assignment”), then I keep order a lot better during this cultural exploration. For my classes, I only give one day for research if they are working with a partner and one and a half class periods if working alone.

Next, I give them a piece of manila construction paper (smaller pieces of butcher paper or even copy paper would do too). On this, I make them sketch out where they will be putting each piece of information. I remind them to leave room for the title to be the biggest thing at the top or in the middle of the poster. We talk about how the graph and Venn Diagram will take up more space than other things AND that decorations make any poster more appealing.

Finally, I give them the poster and give them another deadline to have it complete. Usually, I give two class periods. They have done the research and made a plan at this point, so it should just be putting the information on the poster and decorating as needed.

Finally, it is time for the Gallery Walk! We hang the posters around the room or down a hallway in the school, whichever works best for your teaching context. Depending on how many posters we have, I give each student a piece of paper and have them fold it into sections (they can write on the front and back of the paper). They will walk around and read about other countries. I usually have them write down the name of the country, the most interesting fact they learned and one thing they noticed that country has in common with our country’s practices (getting in that “Connections” part).

This will generally fill up an entire 5 days of 45-50 minute classes or 2-3 blocks. It is a great strategy for students to research and share information without getting bored through a TON of presentations. You can use this any time of year and for ANY topic you want. You can shorten the project by reducing the number of things they have to find and include on the poster. You can level up or down by choosing the language the posters are created in and the type of information you require.

Hope this helps you plan out an easy week where students learn a LOT about culture and YOU get to just watch them learn and share.

Happy Teaching!

You can go HERE and learn more about the SraKSpanish squads! Join today!

Follow this blog for more great, free resources! Find me on Instagram (@SraKSpanish) and Follow my TpT store as I build more resources!